Wednesday, October 2, 2013

in between

Currently, in between starting to move and moving into our new home sometime in October:


We have been so blessed to have a roof over our heads at Andy's parents' home!

Friday, September 13, 2013

change

I moved to Wisconsin when I was "straight out of the chute" married.  Where the work is, you live.

North-east Wisconsin was an adjustment for me, for sure.

Eight years later....and I have grown to love it.  I have learned to value the pros and to laugh off the cons.  I have appreciated the wide open countryside, where you can see the sunrises and sunsets all full of color and glory of the Lord.  I have gained some life-long, kindred-spirit friends.  I have struggled and prayed.  I have shopped at the infamous Woodmans.  I have watched Green Bay Packer fanatics.

And I have sought hard to rest in the joy my Savior, regardless of my circumstances and of  how I feel.  And what do you know, He caused me to love our little life in Wisconsin.

This summer, in June, I snapped this picture (a photographer I am not).


It is of the early morning straight out of my patio window, out into the open back of our home.  I usually sit on our small couch in the morning stillness, praying and thinking and reading and drinking coffee (preferably!).  I took this picture to remind me of my private mornings with just God and me, right here.  Andy is at work, baby is sleeping.

I pretended that this backyard cornfield view was our own secluded Tuscan vineyard.  That's what I'll say it is, I told myself.

The next day after I took this special photo, all settled in my soul about being here in Wisconsin, Andy got an e-mail.  An e-mail that changed where our lives are headed.

And with that, we are all moved out.

Just like that.

New job, new house (soon!), new adventure.

I do not do change well.  It is messy and hard.  It is chaotic and sad.  I miss people, I miss places.

And yet, in this change, I am being challenged to just be thankful.  To be thankful that God is.  To be thankful that He gave me Wisconsin at all.  And to hold my husband and little boy tightly.  And to trust Him for the future.

Change.  Hard.

But, I serve God.  And He does not change.  He is. 

And with that, I move forward.

Tuesday, June 25, 2013

mango avocado salsa dip

I am on a healthy snack quest, as I've stated before.  This mango-avocado recipe is one I have been using since I discovered it last year and tweaked it a tad.  But, I've usually used it to top grilled fish.  Lately, I have been enjoying this as more of a snack to eat with pita chips, since mangoes and avocados have been on sale at my local market.  It is quite tasty, if I do say so myself!


Mango Avocado Salsa Dip

1 mango, peeled and cut into 1/2-inch cubes
1 avocado, halved, pitted, and cut into 1/2-inch cubes
red onion, chopped finely (to taste)*
fresh cilantro, chopped (to taste)
1 lime, halved and squeezed
1 Tbsp. evoo
S & P (to taste)
Stir all of the ingredients together.  Chill before serving.  Store in the refrigerator.
*Note:  You can use green onions or chives in place of the red onion, if desired.  If you want to use this over grilled fish, simply spoon it over the hot fish on either a serving platter or on individual plates.


Enjoy!

Original recipe found here.


Wednesday, June 12, 2013

anchors away

I have a thing for anchors.  I do.  And all things nautical.

Funny...so do two of my sisters!  We are trying to convince our other sister to join the club and to get some boat shoes to go with some nautical things.  It's possible that we are also trying to dress her daughter in anchor apparel.  Just maybe. 

Over Memorial Day weekend, I got to be with those two "anchor sisters."  Sister time is just the best.  Although, we missed out other sister who lives farther away.  We went to Lake Michigan and had some time on the beach.  The next day, I convinced them to make some anchor shirts with me.  It is ridiculous how excited I was about it.  I mean, here is my inspiration:


 {via}


{via}


I am quite sure that there is a smarter way to make a graphic tee than the method I used, but here it is anyway!

Stenciled Graphic Tee

Supplies:
tee shirt of your choosing {I used a long-sleeved striped shirt that I thrifted}, washed and dried
copier
scissors
scrap piece of cardboard
pencil/chalk/marker/etc.
multi-surface/fabric paint of your choosing {I used Martha Stewart Deep Sea multi-surface satin finish paint}
small paintbrush

Time Commitment:
Approximately 30 minutes, plus drying time. 

Cost:
tee   $6.00
paint   $1.65 {I used a coupon at JoAnn Fabrics}
{the other supplies I already had in our home}
Total:  $7.65

Print off an image of your choosing.  Cut around it carefully with a sharp pair of scissors.


Take a basic tee that you don't mind embellishing.


Add a piece of cardboard in between the front and back of the shirt to create stability and to prevent paint from leaking to the back piece of your tee.


Trace around your "stencil" onto the shirt, being careful to make it visible enough for you to see to paint in between the lines. 


The jersey material of a tee may be tricky, but just be patient.  (This image is hard to see, but I used pencil.)


Using a small paintbrush, trace with your desired paint along the lines to get the graphic all set.  It will not look great right away, but hang on!  It's coming!  (Yes, I smudged on the side there...oops.  My sister told me it just looks like a water drop by the anchor.  Silly.)


Fill in the lines with paint, making sure to add enough coverage.  Let it dry, and voila!  How fun is that?


I wore it with a fun vintage necklace that I thrifted (nautical and J.Crew-inspired!).  I also wore some of my favorite bracelets from my mom and from a friend.


***Note:  I do not expect this graphic to hold up forever.  I washed the tee inside out already, and the paint did crack a bit.  Ah, well.  It will be fun for this season, at least!

My sister did one, too!  She used chalk to trace her anchor on the gray, and it turned out great.


My baby sis almost painted white on her navy tee, but then during the tracing stage she had a brilliant idea:  stitch it with embroidery floss!  I think it is adorable, especially on her.

 
I used the same method to make an itty bitty shirt for a baby girl gift for a friend of mine.  My baby sis helped me with this one, too. 


Love you, sisters!

Monday, May 20, 2013

book page art

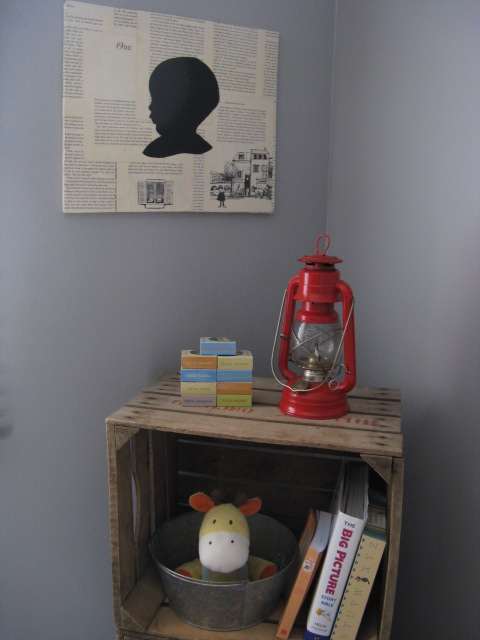
I am a sucker for a fun project with meaning.  This one is just that:  book page art with J's silhouette.


I got my inspiration from the fabulous Jones Design Company.  My baby sis and I have a thing for her blog.  It really is lovely.  I used her book page canvas tutorial (here) and decided to add J's silhouette to it.  She also has a tutorial for doing a silhouette (here), but I used the version in my head...which of course is much less sophisticated.

Since I did this project last fall before I started my blog, I do not have pictures of a tutorial.  But, here are a few tips:

Book Page Art
 
Supplies:
canvas or old wood {I used some spare plywood from our basement}
old book with pages you like {I got a old children's book at Goodwill}
scissors
Mod Podge
small paintbrush
masking tape
sawtooth hanger for the wall, with nails
 
Silhouette Version Supplies:
camera/printer
copier {local copy store}
pencil
black paint
small paintbrush

Time Commitment:
Approx. 2 hours total, plus drying time and errand time out getting an enlargement of your photo.  Also, it depends on how long it takes to snap a profile picture of your child...so mine took roughly 17.56 hours. 
 
Cost:
book   $1.57
Mod Podge   $3.49 {used a coupon at Hobby Lobby}
{the other supplies I already had in our home, and a friend did my enlargement for free}
Total:  $5.06
 
Use this tutorial to make your canvas/wood/board:  Jones Design Company.  One additional thing I did was to use masking tape to attach the pages to the back of the plywood, just to secure them better than the Mod Podge could do.
 
Allow your piece of art to dry until all of the tackiness is gone (no puns, please, Dad).
 
Silhouette:  Take a profile picture of your child as best as you can.  I did this while J was playing.  It did take quite awhile, but he thought I was playing with him...so there you go. 
 
Print it off on your standard computer printer.  Hold it up to your piece of art to see if the sizing is to your liking.  If not, take it to a local copy store to have them reduce or enlarge the picture. 
 
Cut out the silhouette of your child and trace around it onto the spot you would like on the art.  Fill in the traced silhouette with black paint, or any paint of your choosing.

 
Attach a sawtooth hanger to the back, and hang it up!


This piece of art for J's room has a few special meanings: 

   I love to look at his sweet little profile, something I always want to remember. 

   He was approximately 1 year-old when I did this project, and there was a 'chapter one' page that I used.

   The book pages go well in the corner with his books.  Andy made this bookshelf for him out of old apple crates from the apple orchard we go to with him.

   It seems somewhat vintage to me.  And well, I love vintage things.  And when he outgrows this art for his room, his mommy will keep it for herself for another room.
 
 
My baby sis also liked this project idea, so she made a piece of art for her room on an old canvas. 
 
 
Isn't it so cute?  She, along with our other sister and me, love the beach.  So her room is decorated with a beachy, vintagey vibe.  She has good taste.  And this fits perfectly in it.
 
 The fun part about this project is that there are so many possibilities as to how you can switch this up or personalize it to fit your style or something special in your life.  Enjoy!


Tuesday, May 14, 2013

mommy favs

I love being a mommy to J.  It is the most amazing "job."  It is the hardest and the best, all at the same time.  I sure did not expect to love it quite this much!

Being a mommy has been a hard, hard journey for my physical body. Someday I may write about it. But not today.

Today, I want to share some of my favorite things about being a mommy to J at this season of our lives. The list is long in my heart, so I will only share a few things:


his cute little head bobbing up and around and all over as we sit down to tie his shoes, because he is so overly excited to go outside


holding him, no matter how big he is getting...the smell of his skin and the feel of his hands...I wish I could take these senses in and store them away in my person for my whole life, exactly as they are now, untainted by time


sleepy boy snuggles with his green blankie and his favorite toy, Douglas the dog...hearing him talk and babble on to himself in the backseat


the scent of his hair after being outside in the sun


"Set, go!" at the park...I just can't stand it


Etc.

I just love him.

Thank You, Lord God, for entrusting me with this precious creation of Yours.

Monday, May 6, 2013

neon yellow and gray

My sweet friend over at Suburban Adventure (click here) sent me this project idea from Pinterest.  She has such great project ideas, and I was so excited about this! 

When I couldn't find those colors in a scoop neck t-shirt, I remembered some neon yellow pieces I'd seen (and actually liked) and decided to give it a whirl! My friend was a good sport and went with my color choices. Thanks, B.
Disclaimer:  Oh me, oh my. Neon. Although some of it can be cute, I cannot personally wear a lot of neon, especially clothing pieces with large splashes that look like a paint brush exploded. It reminds me too much of clothing I wore as a child. In the 80s. And there are some things better left in the 80s. At least, this is my personal preference.

However, there are some pops of neon on clothing here or there that I do think are fun!  Plus, my brother has these great neon yellow/green running shoes. I am certain no one will ever hit him on the road because you could spot him from a few miles away.  These shoes were the start of me being on board with a tad bit of neon.  And the images below helped to inspire me further.

{via}
Aren't they pretty?

To view the original tutorial for these t-shirts, click here to see Uber Chic for Cheap walk you through it. 
Here is my version!
Colorblock Tee
Supplies: 
two t-shirts in the same size of different colors
fabric scissors
ruler
pencil
pins
basic thread
sewing machine

Total time: 
Well, that depends!  I am slow, so this took me approximately 1.5 hours.

Pick up two new t-shirts that fit well, both in the same size and in two different colors.  We decided that the scoop neck would work well for this project, and we got our t-shirts from Target for $8 each.


Decide where you would like to cut each shirt in "half."  I measured 2" below the neckline and used a ruler to draw a pencil line across the front of the shirt.


My favorite little man was "helping!"


After you've measured and drawn your line, cut with a sharp pair of fabric scissors.  My mom has a mat and rotary cutter that would have worked great for this.  But, she lives 2.5 hours away!


You will be left with four pieces.


First t-shirt pieces:


 Second t-shirt pieces:  (notice my little helper's hand in the bottom right corner...I love him)


I kept the yellow-topped shirt combination, and I mailed the other pieces to my friend.

Next, turn the pieces inside out and pin the right sides together.


I used plain white thread and my sewing machine that my Gram gave me for our wedding to sew these pieces together.  I do love my Gram so much.  I am super new at sewing, but I am having fun learning.  Slowly.  Very slowly.

I first did a straight stitch to attach the pieces, being very careful with the tension because of the jersey nature of the fabric.  I was also careful to be conscious that the seams on the sides matched up as closely as possible.  Then, I did a zig-zag stitch along the edge of the fabric to avoid any fabric runs later on.


Turn it right side out, and there you have it!


I love how this project turned out.  I wore it with my necklace that Andy gave me last year from J for Mother's Day...one of my very favorite pieces of jewelry to wear.